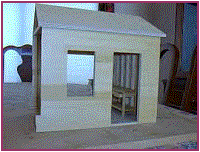
Chapter 6 - Page 2
I Did It My Way …
Walls and Roof
Table of Contents
On to building!
Here's the way I did it. There are many other ways that this could be
approached, so don't think this is the only way -- or even the best way-- but
this is one way.
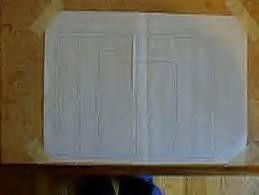
I laid my full
size pattern on my work surface (an old cutting board) and taped it down.
You could cover
your pattern with waxed paper or plastic wrap if your concerned that the wall
might stick to your pattern .
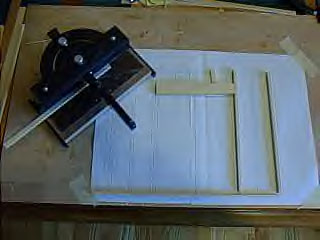 Then I took a couple of straight sticks and carefully tacked them
to the cutting board along the top and bottom of the walls. This will serve to
keep my wall height consistent. Now I lay in the top and bottom
"plates" (sticks) and wedge them between a couple of tacks or
"T" pins or whatever so they can't move back and forth.
Then I took a couple of straight sticks and carefully tacked them
to the cutting board along the top and bottom of the walls. This will serve to
keep my wall height consistent. Now I lay in the top and bottom
"plates" (sticks) and wedge them between a couple of tacks or
"T" pins or whatever so they can't move back and forth.
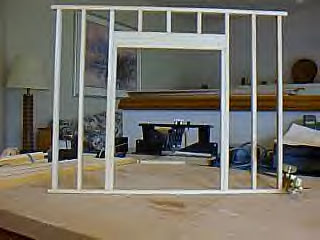
Now it's just a
matter of following the pattern for the rest of the construction. Here is where
the infamous Lego blocks come in to play. By using the Lego blocks (on a Lego
platform) as a square it is easy to make sure that the vertical
"studs" (sticks) are nice and straight as we glue each one in place.
See, there's nothing to it!
Now once you have
all the sticks glued in place go away and let the glue dry. If you pick it up
too soon it's going to fall apart - trust me I know. I also know that if you
drop it on the floor it's going to fall apart, so let the glue dry and be
careful with it.
Very good you
let the glue dry! Now carefully take out the tacks that are holding the wall
from moving and lift the wall off of the pattern.
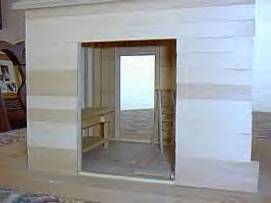 Now you can glue on your sheathing. I just started gluing down
the boards one at a time. When I came to the top of the window and door I laid
a full width piece and trimmed it after the glue was dry with a sharp knife.
Now you can glue on your sheathing. I just started gluing down
the boards one at a time. When I came to the top of the window and door I laid
a full width piece and trimmed it after the glue was dry with a sharp knife.
I f you need to
butt join boards do the joint over one of the studs. You don't want to see the
joints from the inside. Don't be stingy with the glue here - not sloppy either.
This is going to not only give the look I want but it is going to bind the
structure together.
If you should
want to use sheet wood or illustration board for this step no problem. It can be glued on as one big sheet and the
door and window holes can be cut out after the glue dries.
After my wall
had dried I decided that I wanted to put in some fire blocking or stops. These
are the horizontal pieces between the studs. I just used scraps of what I had
left over.
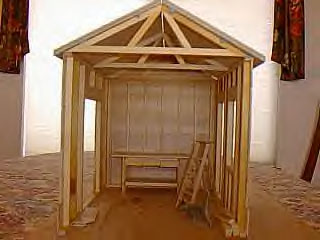
We are rollin'
now. Lets do the other walls and the roof rafters the same way. You'll notice
that I made my forth wall out of plywood.
If this were to
be a stand alone structure I would have done the forth wall the same as the
other three. Because this building is going to be connected to the main house I
have a different plan in mind. We'll get to that later.
For the roof I
chose to use plywood - you don't have to. You could lay sticks like you did on
the walls or even illustration board or foam core. You do need something though
to lay the shingles on .
Be Flexible
One thing to
keep in mind as you work on your project is that you are allowed to be
flexible. If you see something you don't like, change it! It's your project. Build it so it is pleasing
to you. When you are the contractor change orders don't cost much.
I have made
several changes to my original drawing already. I decided the window was too
low to the ground, so I raised it a bit. Originally I was going to have a
closed roof on both sides, but now I'm thinking one side should be open, at
least partially, or I will hide some of the detail I plan on doing. I had also
planned on having the roof rafters on 2' centers - looked too busy, so I'll
take a few out. Ideas will continually
run through your mind some good and some not so good.
Remember ….
![]() Have fun with your project and don't be afraid to try different
things.
Have fun with your project and don't be afraid to try different
things.
![]() Remember you are in control.
You are the architect, the engineer and the builder.
Remember you are in control.
You are the architect, the engineer and the builder.
![]() Use your power!
Use your power!![]()
![]()
Last revised: April 2001