Chapter 6 - Page 3
I Did It My Way …
Doors &
Windows
Table of Contents
Now what shall
we do next? I know we need a door, actually a couple of them, so let's give
that a shot. I have decided to make my doors from scratch. You on the other
hand may have chosen to use a ready-made door. If that's the case, follow along
anyway making doors is fun (putting on the hinges not so much but one bridge at
a time).
I looked in
magazines and on the Internet for the perfect door for my workshop. So with
picture in hand lets build.
There are a
several methods of making doors. As this is just a flat panel door I will be using
the most simple of the methods. All we are going to be doing is making a wood
sandwich.
![]() Start with a piece of 1/16" wood (mine is bass as I am
going to paint it) Wait a minute let me interrupt myself right here for a
moment.
Start with a piece of 1/16" wood (mine is bass as I am
going to paint it) Wait a minute let me interrupt myself right here for a
moment.
Before we can cut
the door to size we need to install the doorframe.
![]() I used 1/16" x 3/8" basswood for this step.
I used 1/16" x 3/8" basswood for this step.
I'm not going to glue the frame in just yet because I will want
to remove it for painting. So just make it a snug fit so the true door opening
can be measured.
 Now take a piece of 1/16" thick wood and cut a piece that
will fit in the doorframe. This piece will be the door core.
Now take a piece of 1/16" thick wood and cut a piece that
will fit in the doorframe. This piece will be the door core.
Now you will
need to cut the rails and stiles (rails are the horizontal pieces and the
stiles are the vertical pieces) from 1/16" wood. The stiles should go from
the top to the bottom and the rails fit between them.

Glue the rails
and stiles to the core and when the glue has set do the same to the other side.
There now doesn't that look nice.
Go ahead and
admire your handiwork for a bit and put it aside. Now it's time to make the
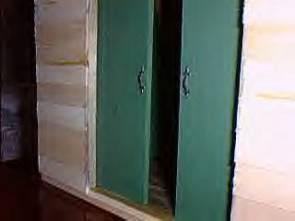
sliding doors.
The sliding doors are constructed in a similar fashion only this
time I used several boards to make the core.
After edge gluing these boards together I added the rails and
cross pieces but to only one side.
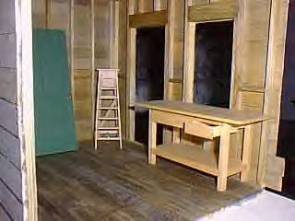
You can make two doors like I did or make one big one. In my
case I could not have opened the door all the way with one big one because the
workshop is not long enough.
Excellent! Now we have the doors done.
But what about the window?
Best get to that before it rains!
As with the door,
there are several options to consider when getting ready to do the windows.
![]() There are many ready-made windows that can be used (remember to
size your opening for them).
There are many ready-made windows that can be used (remember to
size your opening for them).
![]() They can be double hung, single hung, working or not working or
just fixed windows.
They can be double hung, single hung, working or not working or
just fixed windows.
![]() They can have mullions or stained glass panels or maybe etched
glass. You get the picture, lots of
They can have mullions or stained glass panels or maybe etched
glass. You get the picture, lots of 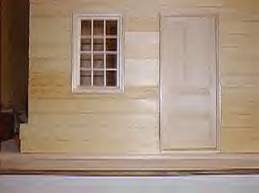 options.
For this project
I want a fixed panel window with divided lights. For those that don't know, a
divided light refers to the little panes. They come in all different
configurations and are categorized by how many little panes there are.
A 4 over 6
window would have 4 panes in the top section of the window and 6 panes in the
bottom. Mine is not a split window so it is just called a 12 light window.
There are enough doors in the workshop to provide air so I have no reason to
want an opening window.
![]() The window is constructed much the same way as the
door (see above), except that the center section is a piece of clear
plastic.
The window is constructed much the same way as the
door (see above), except that the center section is a piece of clear
plastic.
![]() I used .030" thick butyrate but any clear plastic or what
ever you choose to use will work as long as it's not too thick.
I used .030" thick butyrate but any clear plastic or what
ever you choose to use will work as long as it's not too thick.
![]() First line the opening with 1/16" x 3/8"
basswood...........
First line the opening with 1/16" x 3/8"
basswood...........
Now, what's
next?
My thought was
that now is as good a time as any to do some aging . Try to make the new wood
look old. There are many different ways to do this but I'll tell you what I
did. We can explore other methods down the road.
I found three products
in the Micro-Mark catalog that looked like they would be just the right cup of
tea.
![]() Age-it, brown –
Age-it, brown –
![]() Age-it, gray and
Age-it, gray and
![]() Railroad Tie and Bridge stain.
Railroad Tie and Bridge stain.
The first step
was to try the different products on some scrap wood to see the effect.
![]() I brushed a bit of each on different pieces of wood and came to
the conclusion that the Tie and bridge stain was too dark, the gray Age-it was
too dark and the brown Age-it was a bit light and had a tendency to look a bit
green especially where there was some glue squeeze out.
I brushed a bit of each on different pieces of wood and came to
the conclusion that the Tie and bridge stain was too dark, the gray Age-it was
too dark and the brown Age-it was a bit light and had a tendency to look a bit
green especially where there was some glue squeeze out.
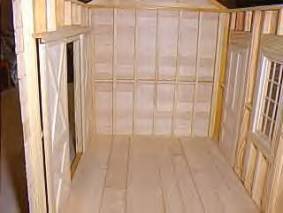
![]() So my final solution was to first apply the brown stain and then
over coat it with the gray on the walls.
So my final solution was to first apply the brown stain and then
over coat it with the gray on the walls.
![]() On the floor I did the same thing except I also brushed on some
of the bridge and tie stain. I'm rather happy with the out come. I thought the
cost was pretty reasonable and I have plenty left if I need to do any more.
On the floor I did the same thing except I also brushed on some
of the bridge and tie stain. I'm rather happy with the out come. I thought the
cost was pretty reasonable and I have plenty left if I need to do any more.
I also wanted to
age the hardware. Depending on what company you purchased your hardware from it
may be brass coated with varnish or lacquer, or it may be brass coated with
gold. I used a combination of the two.
![]() Normally to age brass I just expose it to household ammonia
fumes in a covered glass pan. This worked fine for the varnish coated brass, but
the gold plated brass items remained gold and shiny. I decided to use heat to
try and tarnish it.
Normally to age brass I just expose it to household ammonia
fumes in a covered glass pan. This worked fine for the varnish coated brass, but
the gold plated brass items remained gold and shiny. I decided to use heat to
try and tarnish it.
![]() I used a small pencil torch and heated the items till they just
turned red and then let them air cool. This worked quite nicely and gave me the
weathered look I was after.
I used a small pencil torch and heated the items till they just
turned red and then let them air cool. This worked quite nicely and gave me the
weathered look I was after.
Prepare
foundation pieces:
Before I start
the siding I want to cut the foundation pieces so that I will be able to line
the siding courses up between the two buildings.
![]() I did this with some ¾" pine cut to the height I wanted.
I did this with some ¾" pine cut to the height I wanted.
![]() Note that on the end that the workshop is going to attach to I
made the pieces ¼" shorter this is where the tongue I left on the shop
floor will anchor to the main house when I'm ready to attach it.
Note that on the end that the workshop is going to attach to I
made the pieces ¼" shorter this is where the tongue I left on the shop
floor will anchor to the main house when I'm ready to attach it.
![]() I just cut the foundation pieces to length with mitered corners
and glued them together with a couple of 1 ¼" brads for extra support.
I just cut the foundation pieces to length with mitered corners
and glued them together with a couple of 1 ¼" brads for extra support.
Time to
move on to the siding.
As I am going to
paint the structure I decided to give the MDF siding sheets a go and see how
they would work.
My biggest
complaint with them is the lap system didn't seem to be cut quite right so
where the sheets join there is more of a bevel than on the rest of the sheet.
Minor problem but annoying just the same. Given the fact that the MDF was almost
half the price of basswood siding I would use it again for sure. Of course I
haven't painted it yet so I'll have to see how that goes before I make a final
determination.
Putting on the
siding is pretty straightforward.
![]() The one thing I tried to be careful of is to make sure the
siding courses on the main house and the workshop lined up. Normally I would
just start at the bottom and work my way up the wall but this time I started
and the top of the wall and worked my way down. I wanted the siding to line up
the best at the major focal point rather at the bottom.
The one thing I tried to be careful of is to make sure the
siding courses on the main house and the workshop lined up. Normally I would
just start at the bottom and work my way up the wall but this time I started
and the top of the wall and worked my way down. I wanted the siding to line up
the best at the major focal point rather at the bottom.
Just A Short Aside On The MDF
Siding
![]() I had no problem putting it on or cutting it but…. I did find
that when the side was completed it did not line up at all well with the siding
on the main building. Whether or no the basswood siding would do any better I'm
not sure. I have some coming so will check that out when it gets here.
I had no problem putting it on or cutting it but…. I did find
that when the side was completed it did not line up at all well with the siding
on the main building. Whether or no the basswood siding would do any better I'm
not sure. I have some coming so will check that out when it gets here.
![]() One other problem I encountered with the MDF was that the sheets
did not lay very well when two sheets are put together. I think that the
grooves were a bit under-milled and I did deepen the grooves a bit which seemed
to help. I'm not sure if this was a fault of the manufacturer or that it had
spent a couple of years in the garage and it collected some moisture and
swelled a bit. Not sure.
One other problem I encountered with the MDF was that the sheets
did not lay very well when two sheets are put together. I think that the
grooves were a bit under-milled and I did deepen the grooves a bit which seemed
to help. I'm not sure if this was a fault of the manufacturer or that it had
spent a couple of years in the garage and it collected some moisture and
swelled a bit. Not sure.
![]() At any rate on the plus side it did take the paint pretty well
and I am happy with the looks of the finish. If the basswood siding doesn't
line up any better with the main house siding than the MDF did I guess we'll
learn how to do board by board siding. It will be much more noticeable on the
main house additions if the siding doesn't line up.
At any rate on the plus side it did take the paint pretty well
and I am happy with the looks of the finish. If the basswood siding doesn't
line up any better with the main house siding than the MDF did I guess we'll
learn how to do board by board siding. It will be much more noticeable on the
main house additions if the siding doesn't line up.
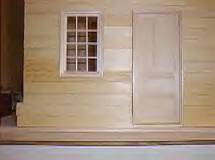
Great, siding is
on and painted! Actually starting to
look like a shop. I think the doors and window installation will be next. I'm
going to hang the door with the hinges I ages a while ago.
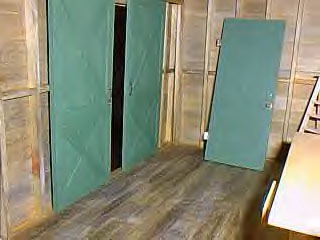
![]() In order to make the hinges work and look right the door and the
doorframe need to be mortised for the hinge. There are other ways to hinge a
door but this is the way I chose at least for this one.
In order to make the hinges work and look right the door and the
doorframe need to be mortised for the hinge. There are other ways to hinge a
door but this is the way I chose at least for this one.
![]() When I did mine I just guessed at where the hinges should be
located rather that going to look. I put them 1" form the top and the
bottom. When I was done it didn't look quite right so I measured a real door.
About ½ inch would have been much closer and on a solid door usually 3 hinges
rather than two. Oh well it'll be all right not a big focal point but I'll
remember in the future.
When I did mine I just guessed at where the hinges should be
located rather that going to look. I put them 1" form the top and the
bottom. When I was done it didn't look quite right so I measured a real door.
About ½ inch would have been much closer and on a solid door usually 3 hinges
rather than two. Oh well it'll be all right not a big focal point but I'll
remember in the future.
More coming
soon - I hope
Last revised: April 2001